27 February 2013

Not Much Progress

I have been staying up late every night sewing away, but I really have nothing to show for it. Okay, well, nothing might be a bit extreme.

I have been working on the eye quilt. I actually successfully pieced my first curves!! The black eyeliner is pieced onto the white of the eye, while everything else is just appliquéd. Interestingly enough, my computer just added the accent mark for me on "appliquéd" and now I feel incredibly fancy.


I am quilting in the eyelashes. The plan was to hand stitch them in using a chain stitch, but the linen was not cooperating with the embroidery thread. Wow, this linen needs to be ironed like crazy!


I actually finished more of the quilting during a crazy Downton Abbey marathon going on at my house but there is no decent light for a photo-op at night. How had I gone this long without seeing this show?? Oh, yeah, I don't have a TV. Thanks to Netflix, a free trial of Hulu Plus, and PBS, I should be caught up by the weekend. 

I also whipped up a green headband and a sash for St. Patrick's day. My friends are celebrating a bit early, this Friday to be exact, because one of our companions is a fire fighter and he is off this weekend. The dress I am planning on wearing is blue with teeny green flowers, so I thought a little bit more green in the form of a sash would help avoid pinching.


Here is a photo of me modeling the headband. It might be a tad too wide, but that is okay. I used an old drawstring from a hoodie to make the tie strings. Side note, I love wearing green because it makes my eyes look green. Yay for magic color change eyes! So yeah, this is me...


24 February 2013

Projects I dislike...

Today I am going to share two projects I have been working on (and avoiding working on) for almost a year. I dislike them, strongly (one much more than the other). Depending on the day, you might even get me to say that I hate one of them. Interestingly enough, they were both commissioned quilts. I wonder if I secretly dislike the having to make them aspect of them or if it was the projects themselves. 

Question: Have you ever taken on a commissioned project? If so, how did it make you feel? 

Okay, I am going to start with the one that I am actually fairly impartial about. Really, all I didn't like about this one is the fabric choice. My mom bought all the fabric and asked me to make the quilt for her cousin who loves cats. We are talking crazy cat lady to the nth degree. So when you consider that, it makes sense. 

Dang, it is just so horrible and tacky though. Ugh. 


But on the up side, it is done and once I drive the 2 hours to deliver it, I never have to see it again!

Then that brings us to the second one. This is the one that I can safely say I hated at times. It is a commissioned tee-shirt quilt for my cousin's friend's daughter. Anyways, she was living in Spain at the time and asked if I could help because the interfacing she bought to make it sucked. My thoughts: "Sure, I have been wanting to try a shirt quilt anyways. Send the shirts!"

Then the box arrived. My cousin's friend's daughter had already cut up all of the shirts and apparently had no idea that when you sew things together, edges need to be straight and corners usually help. She had basically cut around designs and left little to no room to square things up (you know, because things were cut around the design which left triangles, circles, dodecagons, etc.). She also had already sewn on horrible interfacing that had to go. I spent 2 straight weeks of evenings trying to square things up, replace interfacing, and make it not such a nightmare.

Then I just couldn't take it anymore, so I put it all away and waited for inspiration to hit. Inspiration never hit. At this point, it had been half a year or so, and I realized I should have just bit the bullet and sent everything back in the beginning and made up an excuse about not having time (which wouldn't have been a lie with all the time I had already invested with nothing to show). Then both cousin's friend and cousin's friend's daughter started bugging me about progress updates and I started to get upset. I was desperately trying to explain how frustrating it all was because there was hardly enough room to square things up and yada yada.

In my frustration, I decided I did not care what this quilt looked like when it was done. If I butchered a few shirts and cut out part of the picture, who cares? I would not feel bad. Besides, there was no way around it. Plus, I was getting more and more desperate after the status reports.


So I started cutting. Unfortunately it had been so long since I started fiddling around and had applied the correct interfacing that the interfacing had un-fused itself. I didn't even care and kept sewing.

Finally today I can say that the top is done. 


Now I just have to baste and quilt it. Then we get to the backing cousin's friend's daughter sent... IT IS A TAPESTRY. Quilting it is going to be a nightmare. It is also going to be one of the most uncomfortable quilts ever when you factor in the tapestry backing and the excess of interfacing. Oh well. It will all be over soon.

Generally, I only make quilts intended for people I am close to. Both of these were for people I know, but not too well. Hmm. Maybe I just wasn't feeling the love enough to enjoy the quiltmaking process. Maybe it wouldn't have been as bad if I cared about these people more. Probably not on the second one, though.

Now because I can't have a post that is all bad, here is a picture from my garden. My first bluebonnet of the year has arrived. It is a runty little flower, but a bluebonnet nonetheless. As a Texan, I am thrilled!


22 February 2013

My first "Sew Thinky"

QUILTCONQUILTCONQUILTCONQUILTCONZOMGSPWEEE!!!

...I might be getting a teensy bit excited.

This is my first time linking up with Sew Thinky over at Mommy's Nap Time, and I am looking forward to keeping up with it, especially since it happens on Thursdays which are notoriously insomnia filled nights for me. So, here goes...

What is one regular thing you do for yourself to keep up your creative mind? Do you go to a guild, out for coffee with a friend? Are there people / activities you do regularly or as needed? 

Whenever I feel like I need to express my creativity but find myself stuck, I write. Nothing in particular, just writing. For a while, I was writing 10 pages a night about nothing. Writing keeps me grounded. It also acts as a problem solving skill, since I can start writing something I am conflicted about, and after a few pages, I generally have a better idea of what to do. This can be something extreme and life altering, or as mundane as the layout of a quilt block. I have no rules when I write, so I usually include diagrams or sketches, as relevant. 

Scuba diving is another great way for me to reflect and build up my creative energy. I know that might sound silly, but hear me out. When I am underwater, there is no sensory overload from sounds, stress, or people. It is just me, my dive buddy, and the underwater world. I guess you could say I feel like Toki Wartooth when he is singing his little underwater friends song:

There is just such an incredible amount of beauty and life under the surface, and I can't help but find inspiration, peace, and creativity. Sometimes I just stop what I am doing, take a deep breath, and listen. All I can hear is my own breathing as I glide along. It truly is meditative in nature (at least for me).

20 February 2013

Corpus Christi Quilt Show Feb. 2013

I hate to say it but I am generally underwhelmed at local quilt shows because there is hardly anything modern. Plus Civil War quilts and overly appliqued monstrosities get boring after the 57billionth one in a row. This might explain why I have not joined a local guild yet. But, I still went to the quilt show last weekend and took a few photos. So, none of these are my quilts. These were all in the show. I have no idea who made them.

 These first two photos show the same quilt, just one overall, one closeup. The quilting was neato with the shell and dolphins. I wouldn't do it, but I was impressed.

 Escaping blocks! Ahh!

This quilt was composed of teeny tiny flying geese! That is a totally normal pen for scale.

 The description this person put was hilarious. It said something along the lines of: I was going to use 1" squares, but someone told me they were so last year, so I did 1/2" squares.

Bunnies... Riding things? Ooookay.

Woo, star surrounded by pinwheels. Me likey.

This tree was pretty cool and it doesn't look too tremendously challenging either. Score.

This is actually a quilt, not stained glass. WHAT?


Then we jump to the obligatory Texas section, since this is Texas, y'all. Do other states have themed quilts or are we the only ones?

 Remember the Alamo.

 Most effecting use of pebble quilting everrrrr. Closeup of the Alamo.

I included the longhorn quilt because it is adorable. For the record, I'm an Aggie. Gig'em, and all that jazz. 

And then we have this pleasant little Texas landscape quilt. 

19 February 2013

Spray Basting / WIP / Pre QuiltCon

First off: How many of you are going to Quilt Con?! I am so excited!! I live a mere 3.5 hours drive away, but I can only attend on Saturday. If you see me, please say hi! Also, I have tons of family in Austin and spend a lot of time up there so if anyone needs restaurant/bar/fabric shop recommendations, let me know! Now back to the present err, past...

Let me describe yesterday, which happened to be a typical winter day in Corpus Christi, Texas: we hit 80 degrees in the afternoon coupled with 65% humidity, and 40mph wind gusts with sustained winds of 20mph. Okay, okay, so it was 65 degrees day before yesterday and today and it isn't always this windy (usually 10-20mph is standard) but that just means in the summer it is at least 100 humid degrees outside, which means we have heat indices of 110+. Yuck.

Note: Do not ever try to spray baste an 84" x 84" quilt. EVER! Seven feet: What was I thinking?!?

But I digress; back to yesterday and my spray basting adventure. I decided it would be the perfect day to try my hand at spray basting. Aside from the fact that I had to spray baste outside in the vehemently uncooperative wind due to dogs inside and no easily cleanable/large enough surfaces, it was pleasant. Here are a few photos showing the process.

 It is not the spray basting's fault that because of the wind, I found myself screaming curse words in my driveway and furiously stomping on duct tape and mailing tape. Yes, it was so windy I had to tape nearly the entirety of the edges with duct tape, and it was still getting pulled up. I also ran out of duct tape, and switched to mailing tape. Then I ran out of mailing tape but luckily had a new roll that is now nearly gone. I do not blame the spray basting.

So, ignoring all of the things that could obviously not be attributed to the spray basting and doing a perfect world comparison of the two, ZOMG, I LOVE SPRAY BASTING! I want to move somewhere less windy just so I can use it all the time.  But if I moved, that would mean moving away from the adorable and territorial squirrel living by my garden who spent the whole time I was outside chattering at me. Literally folks, the whole time. Chatter chatter chatter.

I still pinned around the edges, just because I'm paranoid and a creature of habit, but gosh, this was not even necessary. Quilting was such a dream with the spray basting. That could be a spurious variable because this was my first time quilting on my new Husqvarna Viking Emerald machine.

I quilted diagonal lines 2 inches apart allover the quilt. I started the first diagonal line from corner to corner, marking it by taping a piece of yarn and tracing with a pencil and ruler. 

Here are some close-ups of the quilting! Mmm, I used Moda Crackle for the backing. 


So here is the whole quilt, in all its glory. I dub thee, Man Quilt. Everyone I show it to says "ohh, my husband/son/boyfriend/etc would love that!" which tells me it truly is the perfect quilt for my engineer boyfriend. I'm too practical and not at all romantic, so I gave it to him today instead of saving it for his birthday. Did I mention it is 7 feet by 7 feet? That makes photographing difficult.

Thanks to the horrible wind, here is a photo showing how the backing coordinates with the front.

Also, the wind was so bad that the quilt was stuck to the fence which was cracking me up.

 I have been trying to wrap up a few little projects this week. I managed to finish two more of the cathedral window pincushions for my friends. This first one is for Toni.

This second one is for Rhonda.

I also finished the giant cathedral window pillow for my friend/dive buddy/yoga instructor, Salinda.

For scale, this is the pillow next to the pincushions.

Today I also finished the February block of the month basket block from the local brick and mortar quilt shop I go to. This one was much more enjoyable to make than the one from last month.

Lastly, I pulled this out of the bowels of my fabric bins. When I first started quilting, and had only made easy peasy 6" square patchwork quilts, I decided to make an eye. I didn't know what paper piecing was. I didn't know what applique was. I didn't know how to assemble a y-seam. Somehow I managed to make this, and got so frustrated that I put it away forever until now. Hopefully it will get closer to being an eye soon. 

13 February 2013

WIP

This is going to be a very quick post because I got so carried away writing this tutorial for a passport cover that I forgot to write my WIP Wednesday entry for the week and it is already 11:44pm. Uhhoh!

First off, the passport cover and the tutorial for it (^see up there for linky^) can safely be crossed off my WIP list. After researching patterns and tutorials for waaaay too long, I decided to make my own since not one that fit my needs seemed to exist. Every passport cover pattern I found had space for at least 2 passports, but most were designed to fit all of the passports for a family with kids. I am a single traveler with no kids, so a passport cover that fits 6 passports seems fairly impractical, dontchathink? So I made up a pattern. Woo.

This second picture was included simply to show off the best pages in my passport with stamps from Japan, France, & Bonaire, oh my!

 I also made up another of the cathedral window pincushions for a friend who loved the one I made for myself. Now about 4 other people want pincushions, so I have an excuse to make more! Yay!

Then my friend/scuba dive buddy/yoga instructor (wow, she sure is a lot of things to me!) asked if I could make this into throw pillow size. So I did some research and found nothing! All cathedral window pillows I found were made of a bunch of tiny ones. I took this as a personal challenge and came up with a 15" block in the same format as the pincushions. The pillow still needs to be assembled, so come back next week for pictures.

This week I also found something tremendously exciting... My broccoli plants are producing a head of broccoli!! Take that, cabbage worms! Once it gets a little bigger, it will be removed which should trigger the plant to start making full-sized heads of broccoli! I'm a broccoli farmer!! Spweee!

I also decided to use the circle of flying geese paper pieced block for my 3x6 block of this quarter. I am in the pinwheel hive, and although it isn't exactly a pinwheel, it does have pinwheelesque characteristics that make it work. I even finished two out of six blocks already and the quarter just started last week!


And last but definitely not least, I convinced myself to suck it up and pick color placements for the quilt I'm making for my boyfriend. He picked the pattern and a good amount of the fabric (green is his favorite color) but I just could not decide where to put all the fabrics. Somehow over the past few days I got all of the fabric cut for the main panel of the quilt and was able to piece it all up last night and today.  First we have the overall main chunk that just needs borders (right now it is only 50" x 50"). Ack. The border fabric. I bought too many options and now I can't decide what to use.

Then a close-up shot to show the fabric selections. He picked a good amount of the fabric, so I can't take credit for all of it. But gosh, it just all works so well together that I wish I could! ;-)

This was my first time using the design wall I made a few weeks ago, and it was so incredible! I could lay out all of the strips and even caught a few mistakes before the rows were all joined. You know, when it isn't an absolute nightmare to rip everything apart.  What a time saver!

Here is a horrible picture of my design wall in action as it saved the day and helped me to spot 2 pieces that were somehow cut 1/2" off, even though I cut them in stacks of 4. Go figure. FYI: This picture was taken at night, so please forgive the terrible lighting.

Anyways, aside from writing exam 1 for my classes and grading papers, that is everything I have been working on this week. How about you? Anything exciting? Funny how this ended up not being a short entry at all.

12 February 2013

Passport Cover Tutorial

Hello! I woke up this morning and decided to make up a passport cover to celebrate the fact that I bought tickets for myself and 2 of my favorite people to go to Ireland this summer. I started hunting everywhere for a tutorial that only held one passport and could not find anything I was happy with. So I had to make one. 

I apologize for the photo quality on some of these pictures because my sewing room is dimly lit.

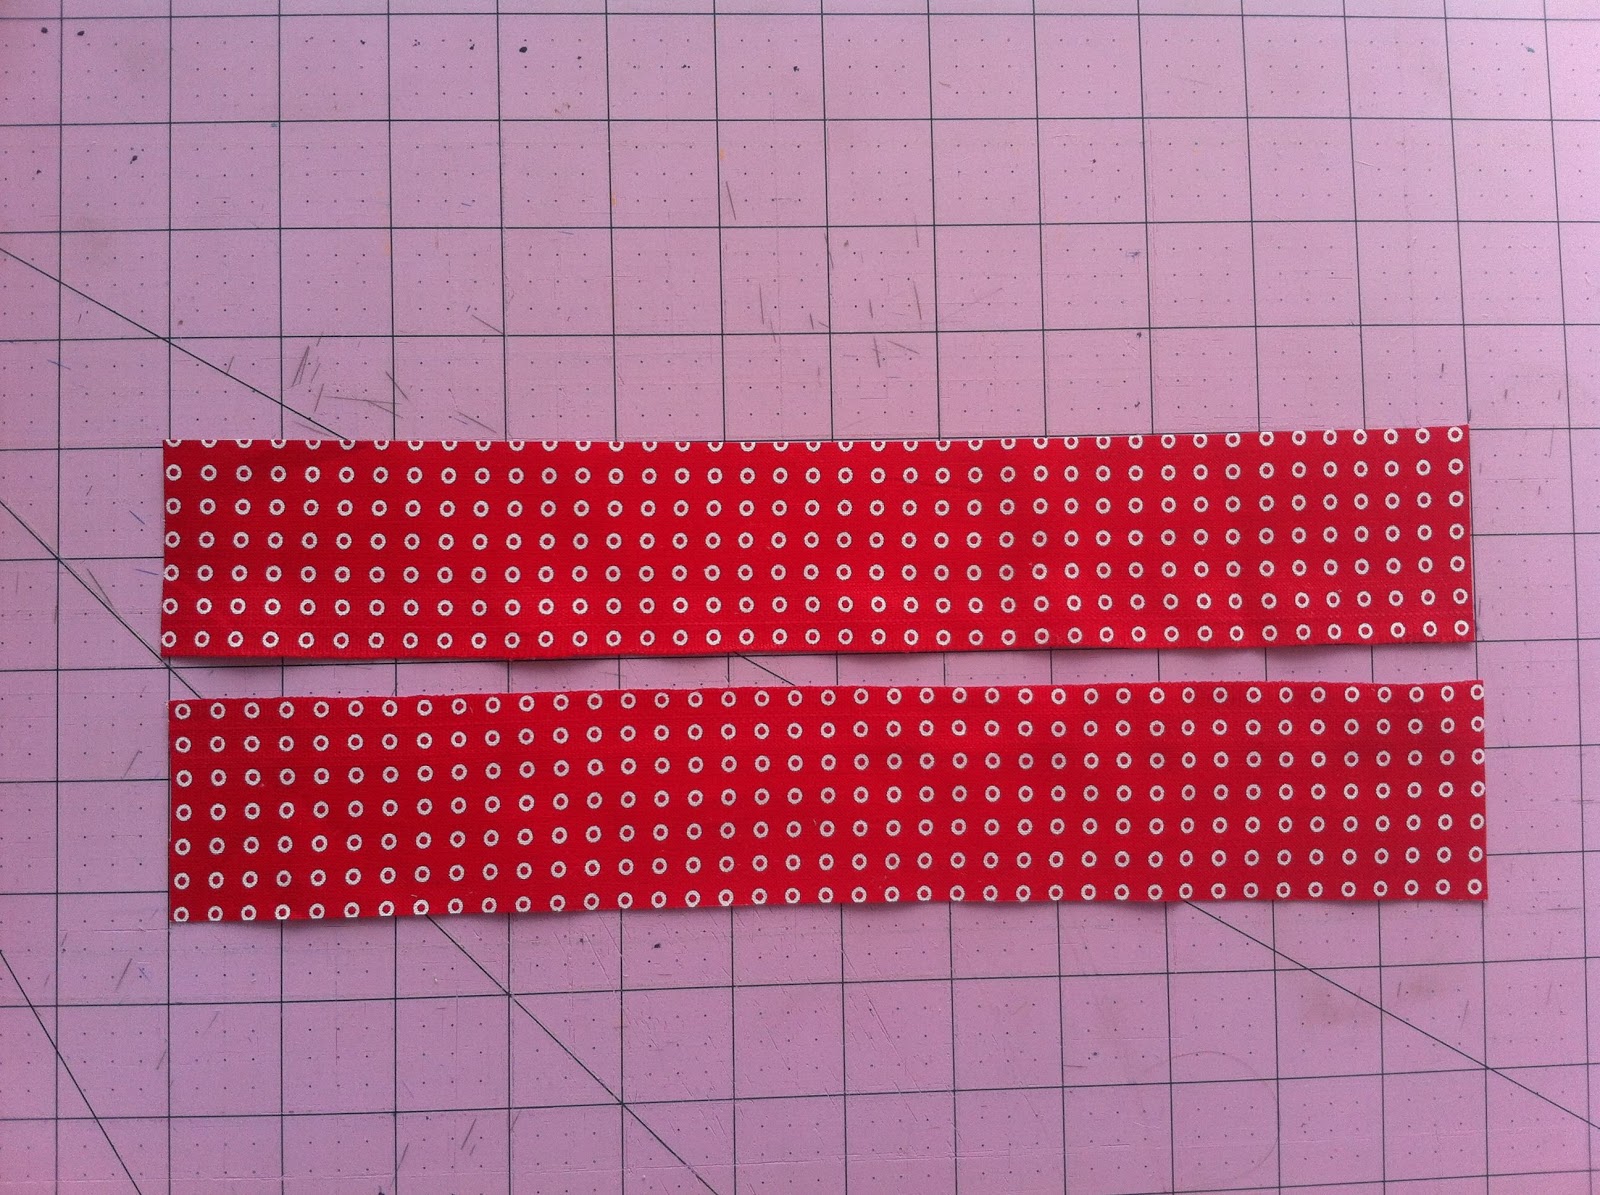
To start with, you need a passport to measure, 2 strips of fabric (2" x 12"), 2 pieces of fabric (8" x 12"), embroidery thread in the color of your choosing, and a passport to measure from.

If you want to, you could use one fabric and skip the strip insertion section on the inside, outside, or both. Eventually you need two pieces of fabric measuring 6.5" x 12. 


I just love these red polka dots.

I used linen for the main fabric, which means I had to iron a lot during this process.


Then you are going to cut the 8" x 12" pieces in halfish leaving you with four 4" x 12" strips. They are oversized at this point so you can have more freedom when you select your final layout later.

Now you are going to sew the contrast strips to the main fabric. I pin like crazy to avoid fabric slipping.

Sew this all using a 1/4" seam. Make sure you take out the pins as you go to avoid running over them.

Once this is done, you are going to press the seam while it is closed to set the seam. 

 Then open it up and press to one side. Since I used linen, I pressed away from that to avoid a bulky mess.

Now you have this!

Next you need to add the second linen half with right sides facing.

Make sure you pin, pin, pin!

After you stitch it together with a 1/4" seam and press, you end up with this:

Now comes decision time. You need to decide what you want the cover to look like. You can center the passport on the stripe:


Or your might want to go for an asymmetrical look and have the passport not centered. This is why we made this a little oversized.

Once you make a decision, trim the strips to 6.5" x 12" and place these with right sides facing.


Don't forget to pin! I didn't pin on one side (left) because you need to leave one unstitched so you can turn it right side out. 

Stitch this with a 1/4" seam too.

Then you are going to clip the corners and turn it right side out. 

Fold in the open edge and edge stitch 1/4" from the edge.


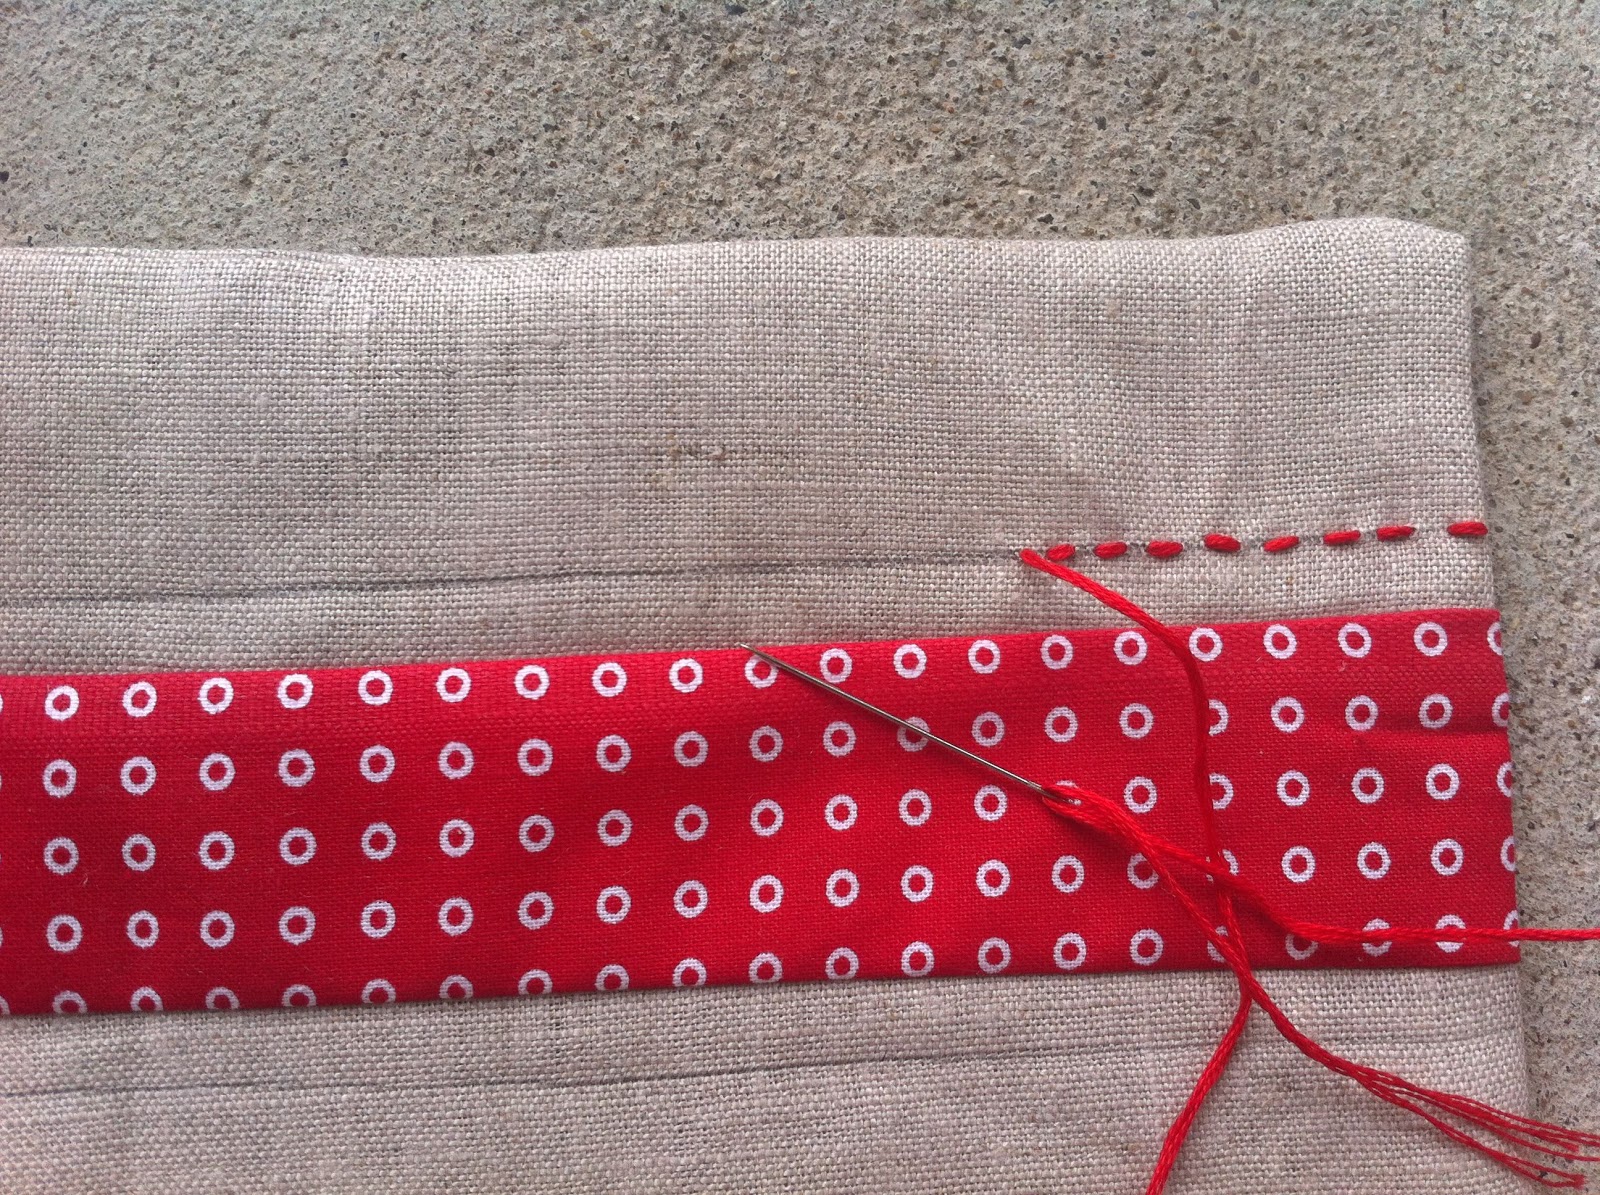
Next is the part that I should have done before I put the layers together: The decorative stitching! I put a pencil line 1/4" from the edge of the stripe. I have never had an issue with pencil marks showing up after.

 Like I said before, you might want to do this before you sew the inside and outside together, but it isn't the end of the world if you forget like I did.

Start the needle from the inside so that the knot will be hidden.

Then just do your best to keep a consistent stitch size as you work your way across the top and bottom. You could also add some cute embroidery, maybe the first letter of the name on the passport so you can keep them organized. Or an airplane! Or your favorite country! Or an adorable animal! Or you can just do lines like me.

Finish it off and hide the knot inside by pushing it in. This picture also shows the edge stitching from before.

Now we are almost there! Go ahead and fold everything in half and press it to make the fold more defined. Trust me, it helps!

 I folded the sides over 1.75" and ironed the folds. Before you iron though, stick your passport in to make sure it fits. You might need to fold a little less or more over. Also, DO NOT IRON YOUR PASSPORT. I don't know if it would hurt it, but still, don't risk it!

Once you have both sides folded over, you are going to stitch across the top and bottom.

Then you are done! Bask in the glory of all that is awesome and enjoy your travels!