I am having a slight problem with spray basting. This is a problem so serious that I can't use it anymore... BECAUSE I CAN'T FIND ANY!
There is absolutely no spray basting to be found in Corpus Christi, Texas.
JoAnn's website says they have 4, but there are none. All of the local quilt shops are sold out. Hobby Lobby said they didn't even know what I was talking about.
This is incredibly frustrating because I wanted to finish the baby quilt for Ray and big sister quilt for Reese by Sunday so they can be my presents at Ray's baptism. I had enough left in a can to finish Ray's quilt, but not Reese's.
Ugh. Spray basting is just too amazing. I am absolutely hooked. Just the thought of having to safety-pin baste this quilt is making me want to cry.
Am I going to have to sell out and buy some online? Let's hope it doesn't come to that. :)
...Quilting, Cooking, Crafting, & More!
23 May 2013
17 May 2013
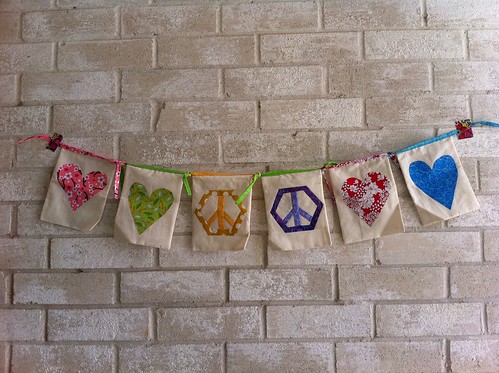
Flags for Boston
I decided to make some flags for the To Boston With Love quilty flag project. They are asking for bright and cheery flags that embody love and peace. The flags are actually going to be displayed in Boston Museum of Fine Arts.
I made a total of six flags, and they all have special meaning to me, which I am thinking is one of the points of this project. If you made one or more flags, I find it nearly impossible that you would be making them with absolutely no love in your heart.

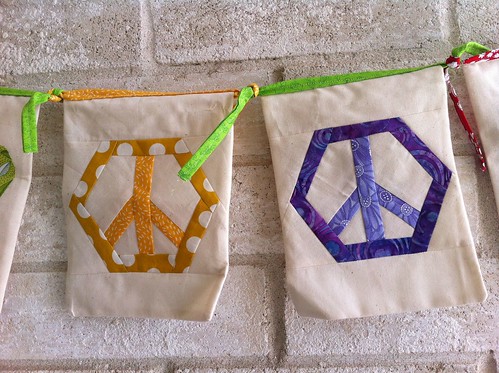
The two peace signs represent the peace I am trying to send to Boston, and the peace we are all able to learn from the people of Boston as they grieve, cope, and live. The pattern for these cute hexagonal peace signs comes from Berene at Happy Sew Lucky and can be found over here. Side note: I paper pieced the inside of the peace sign in the hope that it would come out tidier.

Then I made an appliqued heart for every person I have known and loved that had ever lived in Boston. These first two are for my mom and my cousin Julia. They both attended Wellesley College, which is just outside of Boston. My mom wanted me to make it known to everyone that the blue one is for her.

These last two are for a friend from college and a very close family friend. The family friend (I have known her since she was a wee little kiddo) lives in Boston now, and it was difficult to know she was there by herself during all of this. But she is a tough little cookie.

I made a total of six flags, and they all have special meaning to me, which I am thinking is one of the points of this project. If you made one or more flags, I find it nearly impossible that you would be making them with absolutely no love in your heart.
The two peace signs represent the peace I am trying to send to Boston, and the peace we are all able to learn from the people of Boston as they grieve, cope, and live. The pattern for these cute hexagonal peace signs comes from Berene at Happy Sew Lucky and can be found over here. Side note: I paper pieced the inside of the peace sign in the hope that it would come out tidier.
Then I made an appliqued heart for every person I have known and loved that had ever lived in Boston. These first two are for my mom and my cousin Julia. They both attended Wellesley College, which is just outside of Boston. My mom wanted me to make it known to everyone that the blue one is for her.

These last two are for a friend from college and a very close family friend. The family friend (I have known her since she was a wee little kiddo) lives in Boston now, and it was difficult to know she was there by herself during all of this. But she is a tough little cookie.

14 May 2013
Two Fronts
There has been hardly any progress on anything since I was out of town at an astronomy convention all weekend and have been frantically grading papers before and after that trip. Luckily, grading is nearly done. Also, the situation with this student has been resolved, and by resolved, I mean reported.
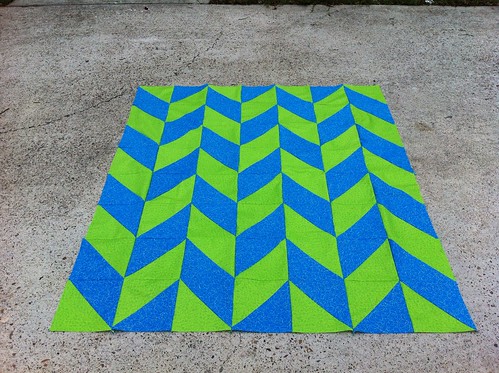
On to quilts! My friends J and S just had a baby on Friday. They did not know if this baby was going to be a boy or girl. I picked a quilt pattern, and bought fabric so that whichever way it went, I would be prepared to finish the quilt.
It was a boy! So I went with these two fabrics. The green is a little off in this lighting. It looks more accurate in the overall picture.

Here is the overall picture! I made a chevron pattern out of 7.25" finished half square triangles. It sewed together very quickly. I have no idea how I am going to quilt this bad boy. It is about 51" x 58" which is large for a baby quilt, but I would rather he grow into it and have it be useful for longer.

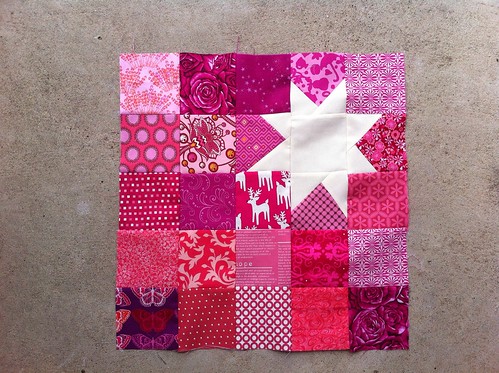
These friends already had a daughter when I met them three years ago, which meant I never made a baby quilt for their first child. She is now 5 years old, so I decided to make her a big sister quilt. The way I see it, she has been the only child for 5 years so she might have some minor adjustment issues, but she is a total trooper. I think this deserves a quilt.
Her favorite colors are pink and purple, but I wanted to include some other colors just in case her favorite colors change. The really dark looking ones are actually not-too-dark purple batiks. This one is 56" x 64". I also have no idea how to quilt this one, but I will figure it out. Also, the pattern for this quilt is from Moda Bakeshop and is called the Apple Crate Pattern.

Hopefully I will finish grading and submit grades soon so that I can start sewing a little bit more. Uggh, wishful thinking! ;)
On to quilts! My friends J and S just had a baby on Friday. They did not know if this baby was going to be a boy or girl. I picked a quilt pattern, and bought fabric so that whichever way it went, I would be prepared to finish the quilt.
It was a boy! So I went with these two fabrics. The green is a little off in this lighting. It looks more accurate in the overall picture.

These friends already had a daughter when I met them three years ago, which meant I never made a baby quilt for their first child. She is now 5 years old, so I decided to make her a big sister quilt. The way I see it, she has been the only child for 5 years so she might have some minor adjustment issues, but she is a total trooper. I think this deserves a quilt.
Her favorite colors are pink and purple, but I wanted to include some other colors just in case her favorite colors change. The really dark looking ones are actually not-too-dark purple batiks. This one is 56" x 64". I also have no idea how to quilt this one, but I will figure it out. Also, the pattern for this quilt is from Moda Bakeshop and is called the Apple Crate Pattern.

Hopefully I will finish grading and submit grades soon so that I can start sewing a little bit more. Uggh, wishful thinking! ;)
07 May 2013
Grading Mania!
I love the end of the semester because it is the end of the semester which means I get a break from teaching. I hate the end of the semester because it means I have such an insanely large pile of stuff to grade.


This semester, I stumbled upon papers from two students who obviously cheated since whole paragraphs are IDENTICAL. I have a warning in my syllabus about academic dishonesty and plagiarism, so I know I should report them, especially since they are college students who need to learn about the real world.
I have no idea if I should report them or not. This is the first time this has happened to me, and the paperwork seems daunting. Ugh. Any opinion?
Anyways, now for happy crafting stuff!
I finished the April and May blocks for Color Bee Shocked.
This is the April block for Caryn. It is a GIANT block, 24.5" unfinished!

Here is the May block for Karrie. This one is also large and ends up being 17.5" unfinished. (The group used this tutorial over here.)
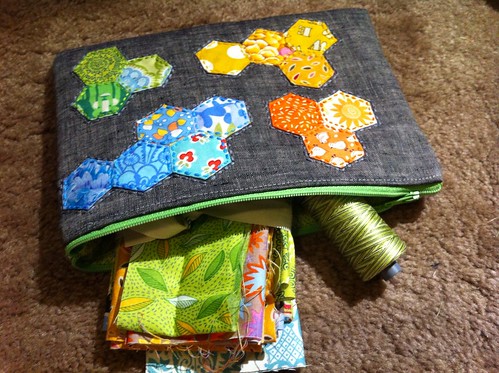
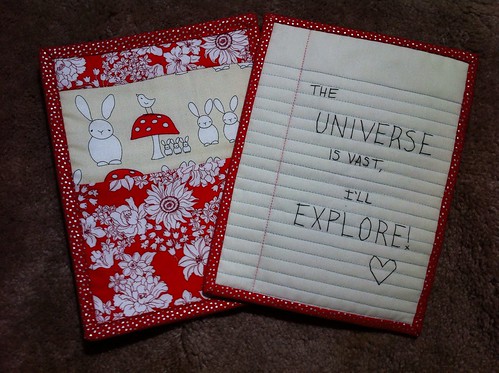
I also mailed out my pouch for the Pretty Little Pouches Swap. Here are the two sides, with some goodies.

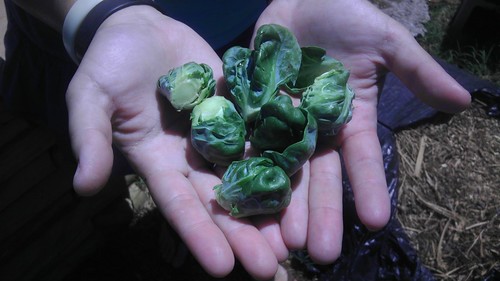
Lastly, I was able to eat some Brussels sprouts from my garden! Yipppeee!
Now I have to go back to work at grading. I should really try to have everything graded by Thursday afternoon since I am going on an amazing road trip to Texas Star Party, the best Astronomy viewing party in the world this weekend! I will try to bring pictures. :)
02 May 2013
HS: Home Sick or Hand Stitching?
I am fairly certain I have contracted the bubonic plague.


That means I have spent nearly all of the past two days snoozing on the couch. For an insomniac, being able to actually sleep is already impressive enough, but sleeping during the day AND night illustrates how sick I truly am.
In between naps I have been doing some hand stitching. This is what will be the front of the pouch I am making for the Pretty Little Pouch Swap.

Here is a reverse shot showing the hand stitching and thread colors!

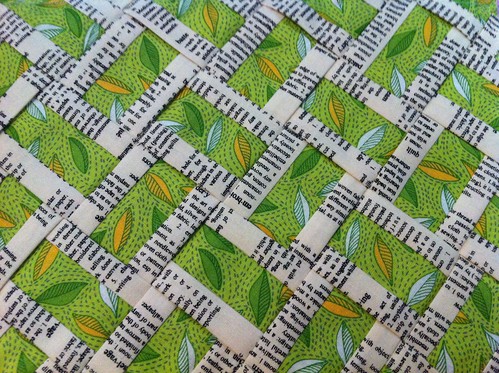
The back of the pouch is going to be the green version of the woven fabric panel I made in this tutorial over here.
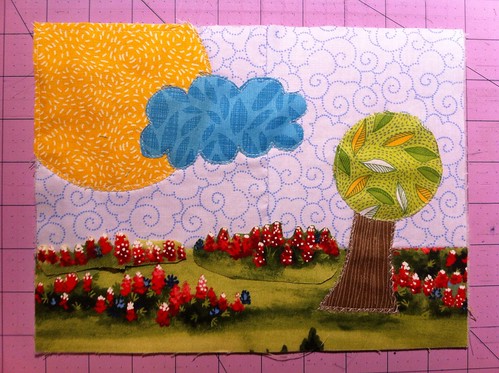
I also managed to start this ridiculous bit of applique for myself. Apparently this is what a fever does to my brain. The fabric styles are so random, which makes me like it more. This version where it is now is definitely underwhelming, don't you think?

My TA Josh suggested more flowers to add depth. So I cut out more wildflowers and am playing around with this now. I will need fusible web for these additional flower bits because my machine applique is not too great yet. It still feels like something is missing, though. Any suggestions??
Well, I'm off to go back to sleep. Maybe I won't get banished from work tomorrow. Or maybe I will and I can fit in more napping and sewing.
01 May 2013
Three Jobs?!
I officially have three jobs again. Which means this is going to be a short post (I always say that...). So now I can say that I am an adjunct professor, a scuba shop employee/dive leader, and the newest addition to the list is swim teacher. I am teaching Baby & Me swim classes, which is terrifying! Anyways, on to crafting!
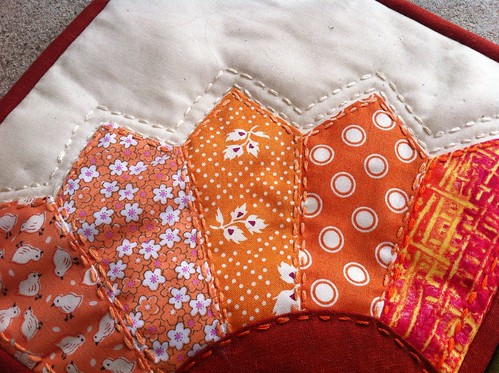
I finished potholders for a former professor/mentor of mine who is now a friend.

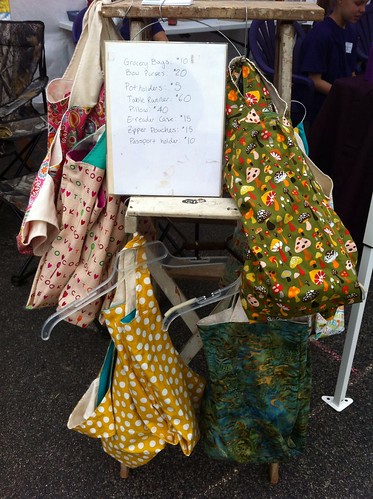
Then there was the craft sale. Here are a few photos of my booth. I didn't sell too much, but it was fun! I ended up finishing 20 grocery bags, 10 purses, 5 zipper pouches, and like 10 potholders. Plus all the other stuff I had been selling for a while.


I also finished the potholders for Potholder Pass! These bad boys are already in the mail.

Here are close-ups of the stitching:


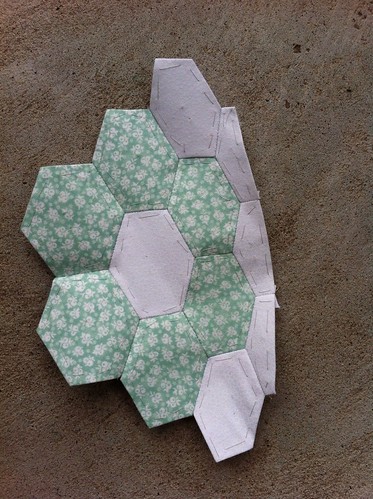
Then I finished the April block for Get Your Hex On.

I had some luck in the garden and was able to eat snacks from my tomato plants this morning. Spweee! I even setup a bunch of tubs and trash cans since it rained for the first time in a year.

Aaaand, I finished the April block for newBEES.

I also worked on a washi dress and stuff for Pretty Little Pouch Swap, but neither of those are ready to share! Woot! I'm off to bed. What have you been working on?
I finished potholders for a former professor/mentor of mine who is now a friend.
Then there was the craft sale. Here are a few photos of my booth. I didn't sell too much, but it was fun! I ended up finishing 20 grocery bags, 10 purses, 5 zipper pouches, and like 10 potholders. Plus all the other stuff I had been selling for a while.

I also finished the potholders for Potholder Pass! These bad boys are already in the mail.

Here are close-ups of the stitching:

Then I finished the April block for Get Your Hex On.
I had some luck in the garden and was able to eat snacks from my tomato plants this morning. Spweee! I even setup a bunch of tubs and trash cans since it rained for the first time in a year.
Aaaand, I finished the April block for newBEES.

I also worked on a washi dress and stuff for Pretty Little Pouch Swap, but neither of those are ready to share! Woot! I'm off to bed. What have you been working on?
22 April 2013
Woven Fabric Panel Tutorial
I saw a quick video from the show Fons & Porter Love of Quilting in which they made woven fabric for a wall hanging. It looked beautiful! I knew I had to try it, so the hunt for a tutorial began. But as usual, nothing could be found. So I made one. You can make this into any size of a panel you want.

The finished size of these panels is 7.5" x 10". They will eventually be the backs of zippered pouches, but you really could make it any size and use this for anything!
Let's begin. First you need to cut a lightweight interfacing to help your woven fabric not go all willy-nilly later. Cut this to whatever size suits your project. Most interfacing is 20" wide, so I cut one strip that was 7.5" wide.

Then I cut that strip in half.

This results in two identical pieces with a dimension of 7.5" x 10". Set these aside for now.

Next we are going to built a strip set. Pick two fabrics. You will cut half as many strips of the primary fabric. I am using this batik for the primary fabric.
Cut 1.25" strips. To cover one 7.5" x 10" panel, I needed 3 strips of this fabric.

From the secondary fabric, I cut 6 strips that also measured 1.25".

Then you are going to sew your strip sets together using a 1/4" seam. If you sew a little bigger or smaller than 1/4", that is okay here, as long as you are consistent.

I like to strip piece these because it saves thread and feels like it goes faster. You will be sewing a strip of secondary fabric on both sides of the primary fabric.

Once all the strip sets are sewn together, you need to set the seams. You do this by pressing with a hot iron while the fold is still closed. Do this on both sides. It helps to keep everything straight and prevents puckering!

Once all the seams are set, you are going to press the seams away from the middle. I like to press from the front as much as possible, which again avoids puckering.

This is what it should look like from the back. If you had already set the seams, you could totally press the seams to the side from the back.

Next we need to make the edges pretty since they will be woven, not sewn together. On the back, you will fold the outer layer in to the stitch line.

I hold them in a few inches ahead of the iron and press both sides at once.

Then you just iron away until all of your strip sets are done!

Go ahead and bring back the pieces of interfacing. Then go ahead and trim the strips to the correct length. You are going to cover the interfacing in one direction first. The bumpy side of the interfacing should be up and facing towards the fabric.
**Note** It helps to do the weaving either on your ironing board or on a piece of fabric so that you don't have to risk dropping it and messing up all your hard weaving work.

Then you are going to start weaving the strips in the other direction. Remember, you are shooting for an under, over, under, over pattern. I fold back every other strip.

Make sure you push the strips together so there are no gaps. Also make sure the whole piece of interfacing is covered.

Once the weave is to your liking, you will carefully carry it to the ironing board and press the weave to the lightweight fusible interfacing.

From the front, it might be difficult to get the interfacing completely fused, so I had luck with carefully flipping it over and ironing from the back. Whatever you do, just make sure you fuse at least a teeny bit of each piece so they don't slip out.

At this point, you are basically done. Because I am paranoid, before trimming the edges, I stitched 1/4" from the edge of the interfacing all around. This just makes sure no part of the weave is going to slide out.

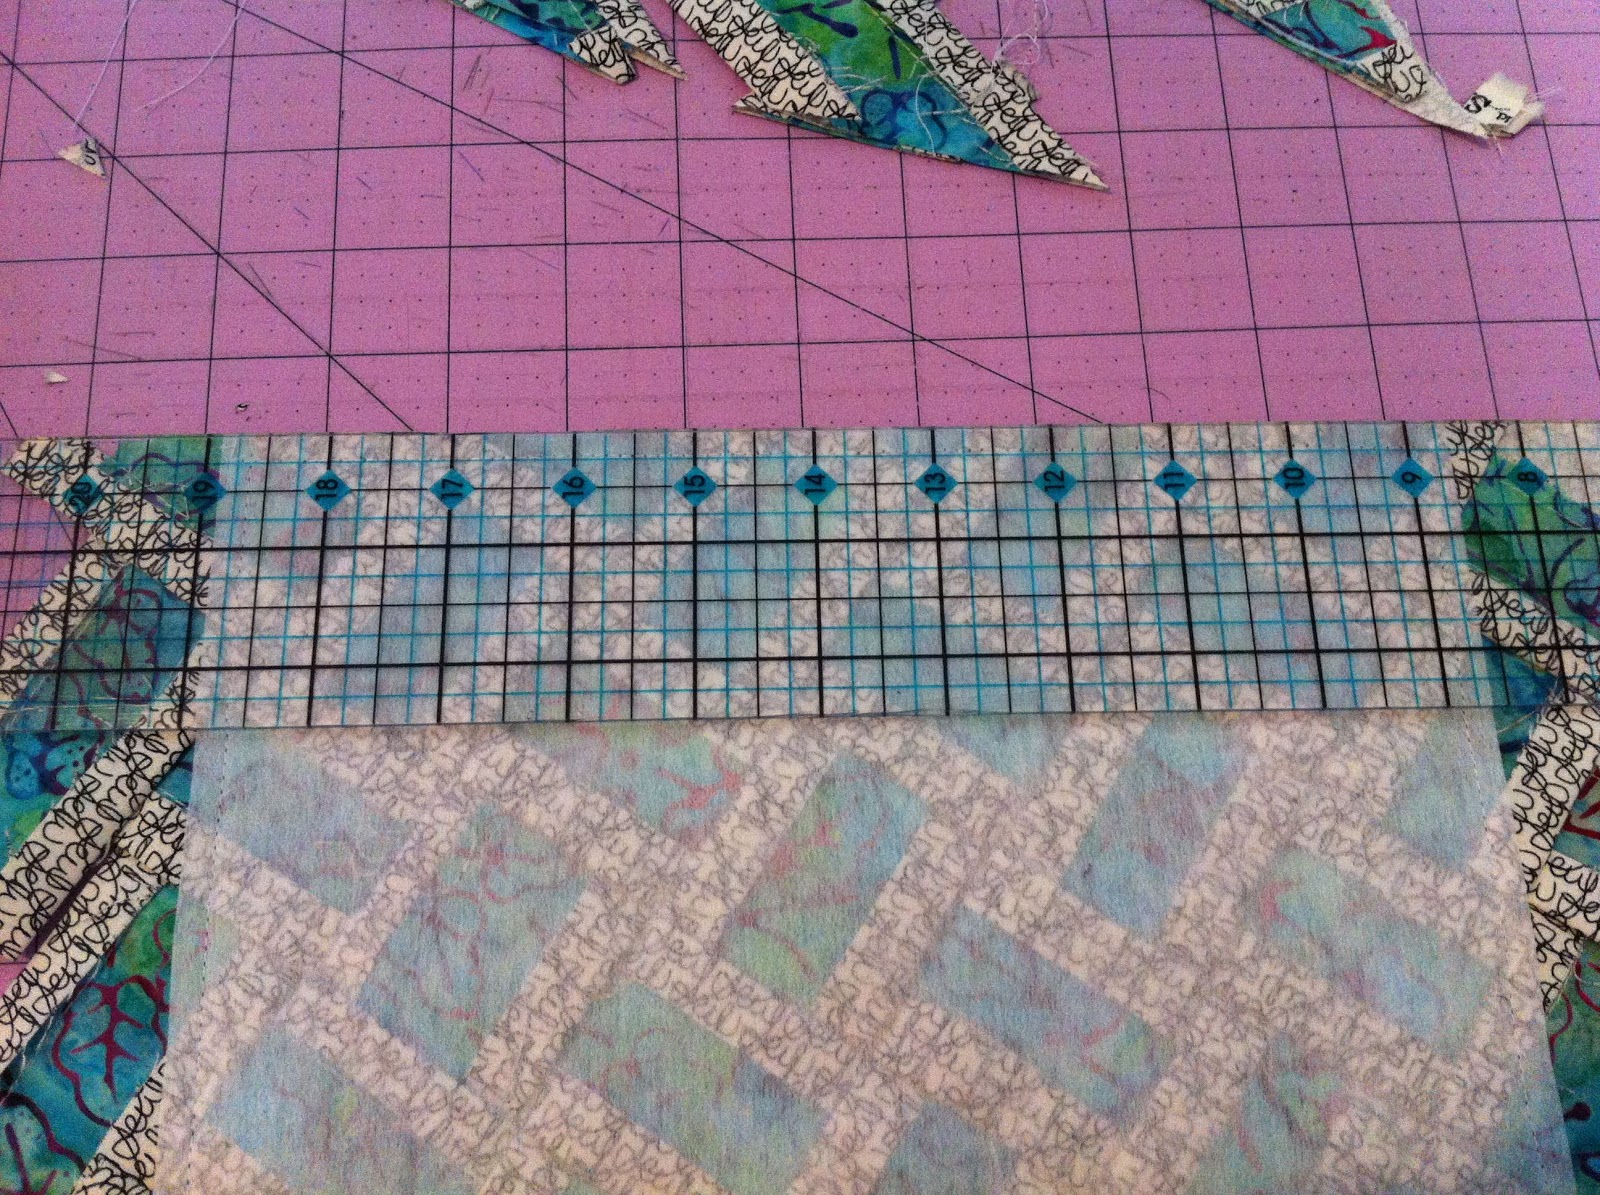
Then all you have left is to trim off the excess fabric. I just used my rotary cutter and ruler to cut around the interfacing.
And that's it!
Now you have a super fun piece of woven fabric that you can hide trinkets in.

Mmm, and the texture! I love it!

You could definitely quilt the panel, or leave it as is. The possibilities are seemingly endless! Apparently I am really into the juxtaposition of a colorful print with texty fabric.


Thanks for reading my tutorial! Let me know if something is unclear. Sometimes I type so fast that my brain can't keep up. I would love to see what you come up with using this technique!
Subscribe to:
Posts (Atom)